If your water heater is leaking, it should be repaired as soon as possible. Leaks can cause significant damage to your home and are dangerous for your family’s health.
Often, a small repair is all that’s needed to restore your water heater to good condition. If your unit is beyond its expected lifespan, however, it may be worth replacing. For more information, click the Learn More to proceed.
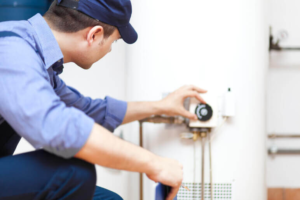
If you’re dealing with an insufficient supply of hot water in your home, it could be a sign that the thermostat isn’t working properly or the heating element is broken. In this case, you’ll need to replace the thermostat or the element, or both. While you can try to do this yourself, it’s often best to hire a professional plumber. They understand the intricacies of these appliances and can offer you a service guarantee, which helps protect your investment.
Thermostats can last up to ten years but might need to be replaced earlier if they become worn out or are corroded due to mineral build-up. This is why it’s important to perform regular maintenance on your water heater, such as flushing the tank and draining the dip tube and the pressure valve.
Before you begin:
- Make sure you shut off the power to your water heater by turning off the circuit breaker in the service panel.
- Once the power is off, open the access door and disconnect the wires from the old thermostat using a flathead screwdriver.
- Remove the old thermostat and install the new one, making sure it is set at the correct temperature of about 115 to 125 degrees Fahrenheit.
You’ll also need to reconnect the electrical wiring and restore power to your water heater by flipping the breaker switch back on. Now, turn on the water supply valve to allow water into your water heater, and then turn on the hot water faucets in your home to test if it is producing warm or hot water again.
This DIY project is only recommended for those who have experience working with electrical devices. It is especially important to ensure that you’re wearing proper safety gear, such as gloves and eye protection, while handling gas lines, which are highly combustible. If you’re unsure of your ability to handle this project yourself, call in a professional plumber from Babes Plumbing, who will be able to safely repair or replace your thermostat. They can also help you troubleshoot the issue and provide preventive maintenance to keep your water heater running smoothly throughout its life span.
Element
When your water heater starts to fail, it can disrupt your daily routine in a big way. You may not be able to take a shower, wash laundry, or even clean dishes. This can create a lot of stress for your family. If your heater is on the fritz, it’s time to call a Carter professional for help.
If you have a water heater with a parts warranty, that could cover the cost of your repair. If you don’t have a warranty, repairing your unit could cost as much as replacing it. If this is the case, it might make more sense to replace your water heater instead of attempting to fix it.
Over time, scale and calcite can build up on the heating elements. This can reduce the amount of heat they can generate, leading to their failure. They can also overheat, which leads to short circuits and electrical fires. These issues are a common cause of breaker trips in electric units.
A water heater element is made of a fine coil of nickel and chromium alloy wire. The more the element is exposed to water, the lower its resistance is. This is why it’s important to keep your water tank flushed regularly. Typically, a plumber will use a drain valve and a garden hose to get rid of the sludge and sediment that accumulate in a water heater.
The thermostat is another small component of a water heater that can break down or malfunction. Its role is to detect the temperature of the water, and when it doesn’t work, the heater will not function properly. A thermostat is relatively inexpensive to repair, and it can usually be fixed by a professional.
The dip tube is a tube that transfers cool water from the top of your water heater to the bottom, where it’s reheated by the lower element. Over time, the tube can wear out or spring a leak, which means it will mix in cold water and lower your overall water temperature.
Dip Tube
If you’re experiencing a lack of hot water in your home, it may be time to replace the dip tube. This is a long, plastic tube that fits into the cold-water inlet of your water heater and stops about 8 inches above the bottom of the tank. Its job is to push incoming cold replacement water to the bottom of the tank, where it’s heated by the gas burner or primary electric heating element. This process keeps dense, cold incoming water from mixing with the lighter hot water that rises to the top of the tank for use throughout your home. If the dip tube fails, your hot water supply will suffer and you’ll be forced to rely on lukewarm water.
Like most water heater parts, the dip tube can be easily replaced with the proper tools and a little know-how. First, turn off the power to your water heater. This is typically done at the circuit breaker or, for gas heaters, by turning off the pilot light. Next, disconnect the cold-water inlet pipe at the nipple where the old dip tube is located. You can usually unscrew the nipple with either a flat screwdriver or a wrench. After you’ve removed the old dip tube, you can insert a new one by using your hands to pull it straight up. A replacement tube should be cut to the appropriate length before being inserted into the nipple.
Once your new dip tube is in place, you can reconnect the cold-water inlet pipe and test your water temperature again. If you’re still experiencing a lack of hot water, it’s likely due to excess sediment buildup in the water heater tank. It’s possible that flushing the water heater tank, with the help of a plumber, will remove this extra sediment and restore your hot water supply.
Pressure Valve
The pressure valve is a water heater safety feature that prevents tank bursts by releasing excess water pressure. If your home’s water heater has a pressure relief valve, it should be tested periodically to ensure it works properly. A faulty or non-functioning valve can result in severe water damage to your home.
To perform a simple test:
- Turn off the power to your water heater by switching off the circuit breaker that is dedicated to it.
- Locate the drainage valve at the bottom of your water heater and attach a garden hose to it.
- Open the drain valve and direct it to a nearby drain, such as a floor drain or outside.
- Once the draining process is complete, close the valve and remove the hose.
Before you begin, be sure to wear rubber gloves and protective eyewear to avoid getting scalded by hot water or gas. Once you have disconnected the electrical wiring and removed the old heating element, it is time to replace it. Screw the new one into place and then reconnect the wires. Once all the connections are secure, you can return the power supply to the water heater by turning on the breaker again.
If you do not feel confident performing this DIY repair, it’s recommended to hire a professional plumber. Professional plumbers can diagnose the issue quickly and accurately, saving you both money and stress. In addition, they typically provide a service guarantee, giving you peace of mind that your repairs will be done correctly.
As you can see, a water heater can have many components that are susceptible to leaking or malfunctioning over time. By regularly testing and performing maintenance, you can extend the life of your water heater, minimizing costly repairs and ensuring that you always have access to clean, hot water in your home. If you are in need of a water heater repair or would like to learn more about how to care for your home’s plumbing, contact the experienced professionals at Babe Plumbing. Our family-owned business is available 24/7 to help you with all your plumbing needs.